Hey all you cool (black) cats and kittens!
It’s spooky season - which typically means getting together with family and friends for pumpkin carving, creepy costume parties, trick or treating and all things skele-fun - but with many of us having to stay indoors this Halloween due to the Coronavirus, we’ve come up with the purrfect way to keep busy and have some fang-tastic fun at home!
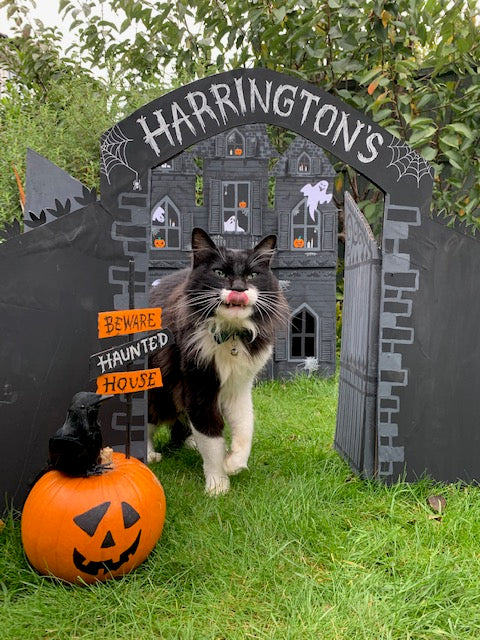
We’ve collaborated with the queen of cat car creators and TikTok star - Jen Prior and her adorable feline friend, Mr T - whose impurrrsive designs include an NHS Ambulance, a Jurassic Park Jeep and a killer T-Minator Tank! We asked Jen if she could create a spooktacular Harrington’s Haunted House for us that you could then create at home for yourselves, and what she came back with was beyond our wildest dreams - or should we say, nightmares! Mr T seemed bewitched with his latest addition to his real estate paw-tfolio, we can’t wait to see what they create next! Check them out over on TikTok at Jenprior1 or on Instagram at jen_prior for more incredible designs.
A guide to creating your own haunted house
Follow this step by step guide to make your very own Haunted House ready for Halloween, we’d love to see your creations! Tag us on Facebook or Instagram using @harringtonspetfood.
Step 1 - Research
Research haunted houses on Pinterest or Instagram for inspiration - this helps you decide what colour scheme and style of house you want to go for - from simple to super intricate, there’s something to suit everyone as well as lots of little extra ideas on how to decorate your house.
Once you’ve decided what look you’re going for, draw a rough design on a bit of paper, as a guide for what you want your spooky creation to look like.

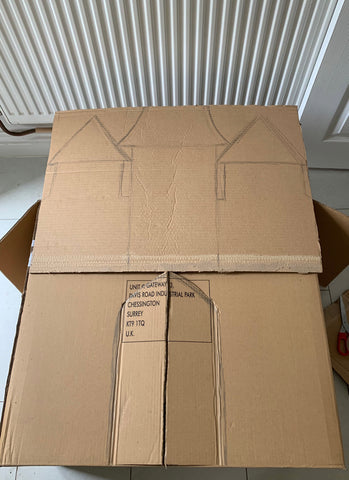
Step 2 - The Box
Find a large cardboard box big enough for your cat (or dog) to fit into, as well as any other bits of cardboard you’ve got hanging around. With a bit of (witch) craft glue and a lick of paint, they’ll transform into the towers that sit on the top of the house and give you an option to make some extra-creepy big gates that open up in front of the house.
Step 3 - Measure (twice!)
Measure the height of your pet to make sure the door and gates will be high enough. You can do this by holding the box next to them or using a ruler and marking the right spot.
Top tip: measure twice, just to be sure! Use a pencil to roughly sketch the door shape and size so then you can see where to cut out and rub out any mistakes.
Step 4 - Cut the doors
Make sure your pet isn't in the box when you cut the door frame out, they might think you're playing a game and end up hurting themselves! If you have one to hand, use a scalpel to cut the doors out for a nice smooth edge, but scissors will do the job just fine too!
Remember to cut out the top of the door frame, the middle line and the bottom line, don’t cut the door hinge area as this is where the door will bend.

Step 5 - Tower time
Measure an extra bit of cardboard out so that it's the same width as the cardboard box. This will be a template for your creepy towers!
 |
 |
Step 6 - Creating the rooftop
Draw a pencil line where you want to start gluing the extra bit of cardboard, then you can start drawing out the rooftop of your haunted house. Get creative here, you can add turrets, battlements (little gaps along the wall) or even some spooky flags which you can add detail to with paint or pens later.

|
 |
Step 7 - Rooftop assembly and drawing on the design
Cut out the roof template and stick it to your cardboard box with strong double sided sticky tape, or you can use super glue or PVA. It’s quite heavy so make sure you secure it well to avoid it falling off later! Then you can start drawing on details like windows, window frames and roof lines. This is where Jen added a balcony!

Step 8 - Cutting out the windows
Next draw on and cut out the bottom two windows with a scalpel, again please be careful that your pet isn't hiding inside and do take care cutting!

Step 9 - Painting the house and the roof
Once you’ve decided on a colour, it’s time to paint! Jen went with a dark grey, made by mixing a little bit of white acrylic paint in with lots of black acrylic, but you could pick any colour you like. Paint around the windows and doors with your base coat, so you can still see clearly where they’re going to be.
Once the paint dries, dilute a little bit of black paint with lots of water and paint on some spooky black shadows around the windows . Once the paint is on, you can see it getting quite scary already!

Step 10 - Painting the windows
With black paint, fill in the bottom window frame, the windows on the middle row and on the roof. Next, add some black to the door frame which leads to the balcony structure on the middle row, or make it into another window depending on your design.
 |
 |
Step 11- Painting the window frames
For the middle and top floor window frames, add a lighter colour than your base colour so they stand out - Jen went with a light grey, made from mixing a little black paint in with some white - but you could pick any colour that works with your scheme.

Step 12 - Add some black details
This is where you start seeing the house really come together. Add black details in with black paint, like broken metal balcony railings on the balcony to make the house look distressed and run down. Try painting thin black lines on the house to give it a wooden decking feel, or bricks with some crumbling away at the edges. Here, Jen also added bats all over the front of the house, you could add a few spiders in there too!
 |
 |
Step 13 - Paint the door
Mix some red, yellow and blue paint to make a deep brown for the wooden door. Add white or black paint to this mixture to give you different shades of brown to make your door more realistic. Jen mixed a few different colours to make the door look wooden and stripey, but you could paint it a different colour all together and make it your own!
Alternatively, you could cut out some brown paper to the size of the door and stick them down with glue, adding some detail with black and brown pencils.

Step 14 - Use white for cobwebs and candles
With a white gel pen or white paint on a thin brush, draw on some details such as cobwebs for those spiders to live in! This really adds to the haunted house vibe! Try adding some creepy candles to the windows too, you can add the orange flame in the next step.

|
 |
Step 15 - Add some pumpkins and flames
Using orange paint, add some pumpkins to the windows and near the door. You may need to paint over it a few times to make the colour nice and strong, or you could cut out some pumpkin shapes in orange paper.
Once dry (if you used paint), you can then start adding in details like the stalk and face design you would like. Do you want a silly pumpkin or a scary pumpkin?

Step 16 - Add some ghosts
With a white piece of paper, roughly sketch and cut out some ghosts to place in and around the windows. Then start adding in their faces with pen or paint, making them look friendly or extra spoooooky!
After you’ve given each a face, cut them down to size and stick them into place with Pritt Stick, or double-sided tape.

Step 17 - Add the shutters
Cut some rectangle shapes out of paper measured to the height of each set of windows. Paint them black and wait for them to dry before painting fine lines on top in the same colour as the window frames to make them look like shutters - Jen painted hers light grey. Next, glue them on and add some black shadowing around them to make them look more three dimensional.
 |
 |
Step 18 - Paint the Roof tiles
Next, glue some crosses or battered looking flags cut out from paper to the tips of the turrets and paint them black. With the same colour as the window frames, add some tiling detail to the roof. Jen used light grey so it would really stand out against the dark grey background.
Get creative, why not add some classic haunted house spikes or a crow on a chimney?

Step 19 - Final details
Add some more detail around the door once the brown paint has dried by drawing on some door hinges and handles. Look up ‘Gothic Door’ on Pinterest for inspiration! You could add a ‘Do Not Enter’ or ‘Intruders Beware’ sign to give more of a haunted feel.
Add other finishing touches you get from your research to make it as spooky as you like, giving it a real run-down, abandoned house look! Maybe a dark figure in the window or a skeleton near the door.
 |
 |
Step 20 - Create some gates (optional)
In addition to the haunted house, why not create some creepy gates to really set the scene? With some more cardboard, draw out your design, cut it out and paint it in the same style as the house. You can be as creative as you like - Jen added an archway and some old, creaky looking metal gates covered in cobwebs. Let your imagination run wild and create a scene from your worst nightmares!
 |
 |
We can’t wait to see your designs! Be sure you share them with us on facebook and Instagram tagging @harringtonspetfood.
To say a big thank you to Mr T (and Jen) for all his fa-boo-less modelling efforts, we sent him our latest range of dry cat food to keep him happy and healthy whilst managing his busy schedule as a TikTok star! Packed full of natural ingredients, our Harringtons complete cat food range provides the wholesome goodness your cat needs with no artificial colours, flavours, dairy, soya or wheat.
Want more tips and tricks for taking care of your cat? By becoming a member of our Pet Club today, you’ll earn points, get advice, and have access to exclusive rewards — as well as enjoy discounts on your favourite products!
